Can You Make Elements Roll Animation on Powerpoint
Drawing attention to individual talking points in a Microsoft PowerPoint presentation is easy with this simple Grow/Shrink animation.

Image: Getty Images/iStockphoto
Keeping your audience engaged is hard work, but your Microsoft PowerPoint presentation can complement your style in many ways. One way is to highlight the current talking point, and there are many ways to do this; however, one of the easiest is to use the Grow/Shrink animation. All points start out the same size. When discussing a point, it grows, becoming larger and drawing the attention of your viewers to that point. When you move on to the next point, the previous point shrinks while the new point grows, immediately drawing your audience's attention to the new point. In this article, I'll show you how to implement this affective animation that requires very little setup or specialized knowledge.
SEE: 60 Excel tips every user should master (TechRepublic)
I'm using Microsoft 365, but you can use older versions. For your convenience, you can download the demonstration .pptx file. They contain a slide of all the timing setups you'll work though, so you might want to hide slides as you advance to the next setup to avoid having to click though them. You can't create the same timing in the browser, but the browser runs the completed animation. This article assumes you have basic PowerPoint skills, but the instructions are comprehensive.
How to add the bullet points in PowerPoint
You'll need a few text bullet points, similar to those shown in Figure A. If you know how to do this, you can skip this section. Otherwise, do the following:
- Click the Insert tab, click Text Box in the Text group, and then click and drag a bit to insert a simple text box. Don't worry too much about size and position yet.
- Before entering text, click the Home tab and then click Bullets in the Paragraph group.
- Enter the three lines of bulleted text.
- Once you have the list, center it between all four margins and increase the font size a bit. I'm using Calibri 40.
Figure A

Create a few simple bullet points on a blank slide.
With the bullet points in place, it's time to animate them.
SEE: How to use sheet view for more flexible collaboration in Excel (TechRepublic)
How to apply the animation in PowerPoint
That plain set of bullet points is pretty boring, isn't it? Let's add the Grow/Shrink animation twice—once to grow and once to shrink—to all three bullet points. Fortunately, it's easy:
- Select all the bullet points and click the Animations tab.
- Click the Add Animation dropdown in the Advanced Animation group and choose Grow/Shrink from the Emphasis section. If it isn't there, click More Emphasis Effects at the bottom. PowerPoint will give you a quick preview of how the animation will look.
- Repeat steps 1 and 2. I know that sounds odd, but we're going to change some of the settings in the next section.
- Right now, we have three bullet points and two sets of the default Grow/Shrink effect, as you can see in Figure B. The default setting is to grow the text by 150%. If you were to run the animations right now, all three bullet points would grow by 150% and then those enlarged points would then increase by 150%. (If the Animation Pane isn't visible, click the option in the Advanced Animation group.)
Figure B

Add the Grow/Shrink animation to all the bullet points, twice.
How to fix the settings
In this section, we'll start with the simplest timing settings to get something close to what we're after with our Grow/Shrink animation. Then, we'll adjust them in several ways. In doing so, you can learn how these settings relate to the animation.
To start, we'll leave the first animation as is: It grows by 150% at a medium rate and it's triggered by a click. We didn't do a thing to get those settings: Those are the defaults. To set the growth rate for the second set of animations--the shrinking set--do the following:
- Select all three items in the second set of animations (2 with a mouse icon) and then right-click the selection.
- Choose Effect Options from the resulting submenu.
- In the resulting dialog, click the Effect tab (if necessary).
- Click the Size dropdown, type 67% (Figure C) in the Custom control and press Enter. Don't skip Enter—PowerPoint won't retain the new setting if you do. If you want the text to be smaller than its original size, for even more drama, you can enter a smaller percentage. It won't align with the other points, but you might like the offset look.
- Click the Timing tab and choose 1 seconds (Fast) from the Duration dropdown and click OK. That way, the bullet will shrink a tad faster than it grows. It won't matter this time out, but it will later.
Figure C

67% returns the text to its original size.
To see your work so far, select the first animation in the Animation Pane and click Play From. All three items will grow simultaneously and then shrink simultaneously just a bit faster than they grew.
I want to take a minute to explain what you're seeing in the Animation Pane. You have two mouse clicks. The first click grows the three bullets, and the second click shrinks them. By default, the start setting for the second and third items for each mouse click are set to With Previous, which as you can see, triggers all three items with a single mouse click.
SEE: 4 tips for working more efficiently with footnotes and endnotes in Word (TechRepublic)
We want to see something a bit different, don't we? We want to see the first item shrink while the second item grows. That requires a bit of rearranging. We need to move the shrink items, so they immediately follow their grow counterpart. To do so, simply drag the three lower items up to their respective spots. Use the red line that appears to help position the items correctly. The item being moved will slide in under that red line and before the next item. Use Figure D as a guide.
Figure D

The shrink item should follow its respective grow item.
The two mouse clicks are at the top and the With Previous timed items follow. If you run the show now, the first item will grow with the first mouse click—that's all. The second click will shrink the first item and grow and shrink the second and third items at the same time.
At this point, you might be wondering why we didn't create the items in the correct order in the first place, right? We could have done that but doing so would've required a lot of repetitive option settings. This method is a bit more efficient, but more importantly, I hope to expose the relationships between the mouse clicks, the animations, and the start settings. The more you understand how these all work together, the easier you will find it to apply what you've learned to your own work.
SEE: PowerPoint: How to create a snowball that grows as it rolls downhill (TechRepublic)
With all our items now in the correct sequence, grow, shrink; grow, shrink; grow, shrink, we're just a simple step away from completion. But we're going to take a detour, so you can see how a simple setting can change the effect.
First, let's see how things work when all start settings are On Click. To do so, select all six items and choose On Click from the Start setting in the Timing group (on the Animation tab). When you run the show it takes six clicks, but as is, those clicks have purpose because they give you the most control. By clicking, you control when each item grows and when it shrinks.
Second, set all of the shrink items (2, 4, and 6) to After Previous. The animation is similar and requires fewer clicks, but you might need to slow down the After Previous setting to match the discussion.
Let's try a different timing arrangement. Can you figure out on your own now, how to get the next item to grow while shrinking the previous? I'll give you a bit of help. Click one grows the first item. You want the second click to display item 2 and shrink the first. Using Figure E as a guide, set the timing arrangements for each item as follows: Click, Click, After Previous, Click, After Previous, Click.
Figure E
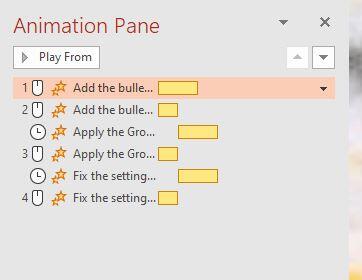
Change the timing for two of the items.
This one is still similar in that you move from one item to the next by shrinking the current item before growing the next. But, you have more control—you click when you're ready to move on to the next point.
Let's take one last look at a subtle different. Change the two After Previous items to With Previous. This timing setup is probably my favorite. The click immediately grows the next item while shrinking the previous item. This exchange seems to take place a bit quicker, but what has really changed is that the audience isn't watching the current item shrink and then watching the next item grow. The two happen simultaneously.
Work on your timing
We spent a lot of time experimenting with different settings to see how they change the Grow/Shrink animation. Doing so should help you understand the sequence of events so you get the results you want when applying this animation to you own work.

Microsoft Weekly Newsletter
Be your company's Microsoft insider by reading these Windows and Office tips, tricks, and cheat sheets. Delivered Mondays and Wednesdays
Sign up todayAlso see
- Windows 10: A cheat sheet (TechRepublic)
- Zoom vs. Microsoft Teams, Google Meet, Cisco WebEx and Skype: Choosing the right video-conferencing apps for you (free PDF) (TechRepublic)
- Hiring Kit: Application engineer (TechRepublic Premium)
- Microsoft 365 (formerly Office 365) for business: Everything you need to know (ZDNet)
- The 10 most important iPhone apps of all time (Download.com)
- It takes work to keep your data private online. These apps can help (CNET)
- Must-read coverage: Programming languages and developer career resources (TechRepublic on Flipboard)
Can You Make Elements Roll Animation on Powerpoint
Source: https://www.techrepublic.com/article/how-to-use-the-growshrink-animation-to-highlight-one-point-at-a-time-in-powerpoint/
Belum ada Komentar untuk "Can You Make Elements Roll Animation on Powerpoint"
Posting Komentar